Sennheiser EW 300 IEM G2 - ANNEXE 141 User's Guide
Browse online or download User's Guide for Motor vehicle electronics Sennheiser EW 300 IEM G2 - ANNEXE 141. Sennheiser EW 300 IEM G2 - ANNEXE 141 User guide User Manual
- Page / 32
- Table of contents
- BOOKMARKS
- Instructions for use 1
- Contents 3
- For your safety 4
- Included with delivery 4
- Capabilities of the WSM 5
- System requirements 6
- Connecting the NET 1 to a PC 7
- Installing the WSM software 7
- Configuring the network 8
- Launching the WSM PC software 8
- The Operator interface of WSM 9
- Symbol bar (tool bar) 10
- Display area 10
- is divided in two. The 10
- Status bar 10
- Overview of menus 11
- The “Help” menu 12
- The “System” menu 12
- The “Channel” menu 12
- The “Applications” menu 12
- The panel display 13
- Editing panels 15
- Deleting panels 16
- Selecting an icon for a panel 17
- Aligning and moving panels 18
- Preparing the firmware update 20
- Configuring devices 26
- If a problem occurs 28
- The program does not launch 29
- Glossary 30
Summary of Contents
Wireless Systems Manager (WSM)Instructions for use
8Symbol bar (tool bar)You can operate the WSM via the menu bar and via the buttons in thesymbol bar. The symbol bar can be shown or hidden (“View Men
9Overview of menusThe “File” menuThe “View” menuMenu item Function of the menu item ButtonOpen Configuration... Opens a saved configuration.Save Confi
10The “System” menuThe “Channel” menuThe following menu items only appear if you have selected a panel.The “Applications” menuThe “Help” menuMenu item
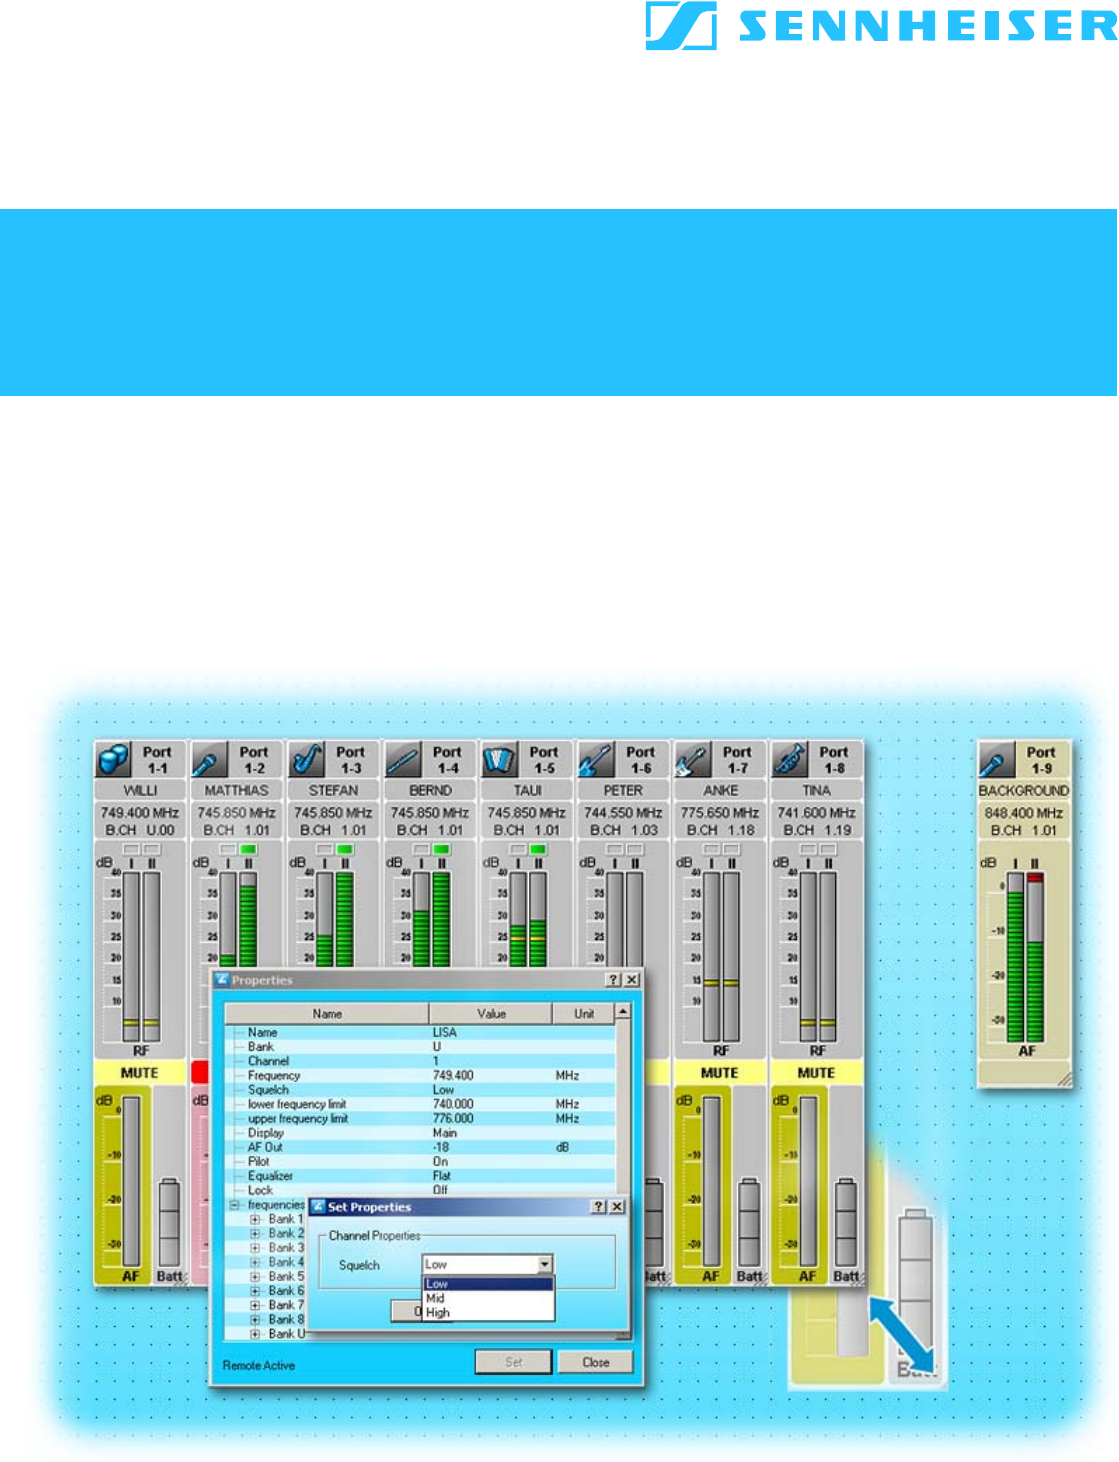
11The panel displayLayout of the panelEvery panel displays a rack-mount device. The graphical representation ofthe panel depends on the device type an
12Diversity displayThe active antenna is displayed in green.The diversity sections of the EM 3532 twin receiver are labeled “A” and“B”, the diversity
13Battery statusThe battery symbol indicates the charge status of the batteries. Thegraphical representation depends on the device and battery type (p
14Deleting panelsTo remove panels from the display area:왘 Right-click on the panel.A contextual menu appears.왘 Click on “Delete”.The panel is deleted
15Note: The graphical representation for a “transmitter” panel depends on thedevice settings.Selecting an icon for a panelYou can assign an icon repre
16Aligning and moving panelsTo align panels to the grid:왘 Click on “View” > “Show Grid” to show the grid.A tick appears in front of the menu item.
17Updating the firmware of the devicesNET 1 is compatible with previously delivered wireless systems (see tableon page 3). However, these systems must
18왘 Click on “OK”.The window closes.Downloading the latest firmware update from the InternetSennheiser continuously improves the WSM. We therefore rec
19If there is a new firmware version available in the “New Releases” folderof the program folder, it is displayed in the “The selected firmwarepackage
20Updating the firmware in the devicesThe firmware is automatically updated in the following order:1. NET 12. Rack-mount devices3. Portable devicesTo
21“Easy Setup” frequency managementUsing the “Easy Setup” frequency management capability, you can:y distribute frequencies in the channel bank to dev
22Performing a frequency preset scan for monitoring systemsNote:The rack-mount transmitters of the corresponding frequency range areautomatically swit
23Allocating frequencies for a monitoring system without a frequency preset scanNote:When you allocate frequencies without a frequency preset scan,int
24Allocating frequencies for a microphone system without a frequency preset scanNote:When you allocate frequencies without a frequency preset scan, in
25Changing the parameters of a deviceThe parameters that you can change depend on the respective device type.Specific information on the parameters ca
26If a problem occursHardwareFirst check the connections and cables for the devices (see NET 1 usermanual).SoftwareThe Sennheiser homepage at www.senn
27SKM 5200왘 Remove the power pack.왘 Slide the multi-function switch upwards (UP ) and keep it in thisposition.왘 Reinsert the power pack.The program do
1ContentsImportant information regarding this manual ... 2For your safety ...
28GlossaryDeviation Modulation associated with the receiver;Represented as a bar diagram (Dev)Easy Setup Function for allocating frequenciesFirmware S
Sennheiser electronic GmbH & Co. KG30900 Wedemark, GermanyPhone +49 (5130) 600 0Fax +49 (5130) 600 300www.sennheiser.comPrinted in Germany Publ.
2Important information regarding this manualThis manual describes the “Wireless Systems Manager” (WSM) PCsoftware for the NET 1 system. Information on
3Capabilities of the WSMThe “Wireless Systems Manager” (WSM) permits real-time monitoring aswell as remote control of all relevant device parameters i
4System requirementsRequired hardwareProcessor: Intel Pentium 4 or AMD Athlon XP, 2 GHz or higherRAM: at least 512 MB (1 GB recommended)Hard drive: mi
5Putting the system into operationConnecting the NET 1 to a PCHow to connect the NET 1 to a PC is shown in the user guide for the NET 1.Installing the
6Configuring the networkTo enable communication between the WSM and the NET 1, configure thenetwork (LAN connections) as follows:Note:Only launch the
7The Operator interface of WSMMain windowThe main window contains the following regions:Menu barSymbol bar (tool bar)Display areaStatus barMenu barThe
More documents for Motor vehicle electronics Sennheiser EW 300 IEM G2 - ANNEXE 141

Related products and manuals for Motor vehicle electronics Sennheiser EW 300 IEM G2 - ANNEXE 141


 (160 pages)
 (32 pages)
© 2020, manymanuals.com. All rights reserved. | 0.356 s |
 Manymanuals.com
 Manymanuals.de
 Manymanuals.fr
 Manymanuals.it
 Manymanuals.pl
 Manymanuals.cz
 Manymanuals.es
 Manymanuals-pt.com
Comments to this Manuals