Sennheiser LV308 User Manual
Browse online or download User Manual for Radio Stations Sennheiser LV308. Sennheiser LV308 User Manual
- Page / 60
- Table of contents
- TROUBLESHOOTING
- BOOKMARKS
- Instructions for use 1
- Contents 3
- Important safety instructions 5
- The tourguide UHF system 8
- System components 8
- EK 1038 receiver 9
- Indications 10
- Preparing for use 11
- Using the receiver 12
- SETUP Configure the receiver 13
- Using the receiver 15
- USER-MENÜ 16
- COPY Copy function 20
- L 2015 quick charger 22
- Operating controls 23
- Using the charger 25
- Care and maintenance 25
- Suitable transmitters of the 26
- L 2015 quick charger 27
- Delivery includes 28
- Operating Controls 28
- Using the radiomicrophone 30
- LC display panel of the 39
- Overview of menus 41
- The buttons 41
- PTM.OFF 43
- (SKP 500 G2 only) 46
- NAME Entering a name 47
- Troubleshooting 49
- Recommendations and tips 50
- HDX noise reduction 51
- Accessories and spare parts 52
- Accessories and spare parts 53
- Specifications 54
- Plug-in mains units 55
- Channel assignment 56
- Manufacturer declarations 57
- CE Declaration of Conformity 58
- WEEE Declaration 58
- Manufacturer declarations 59
Summary of Contents
tourguide UHFInstructions for use
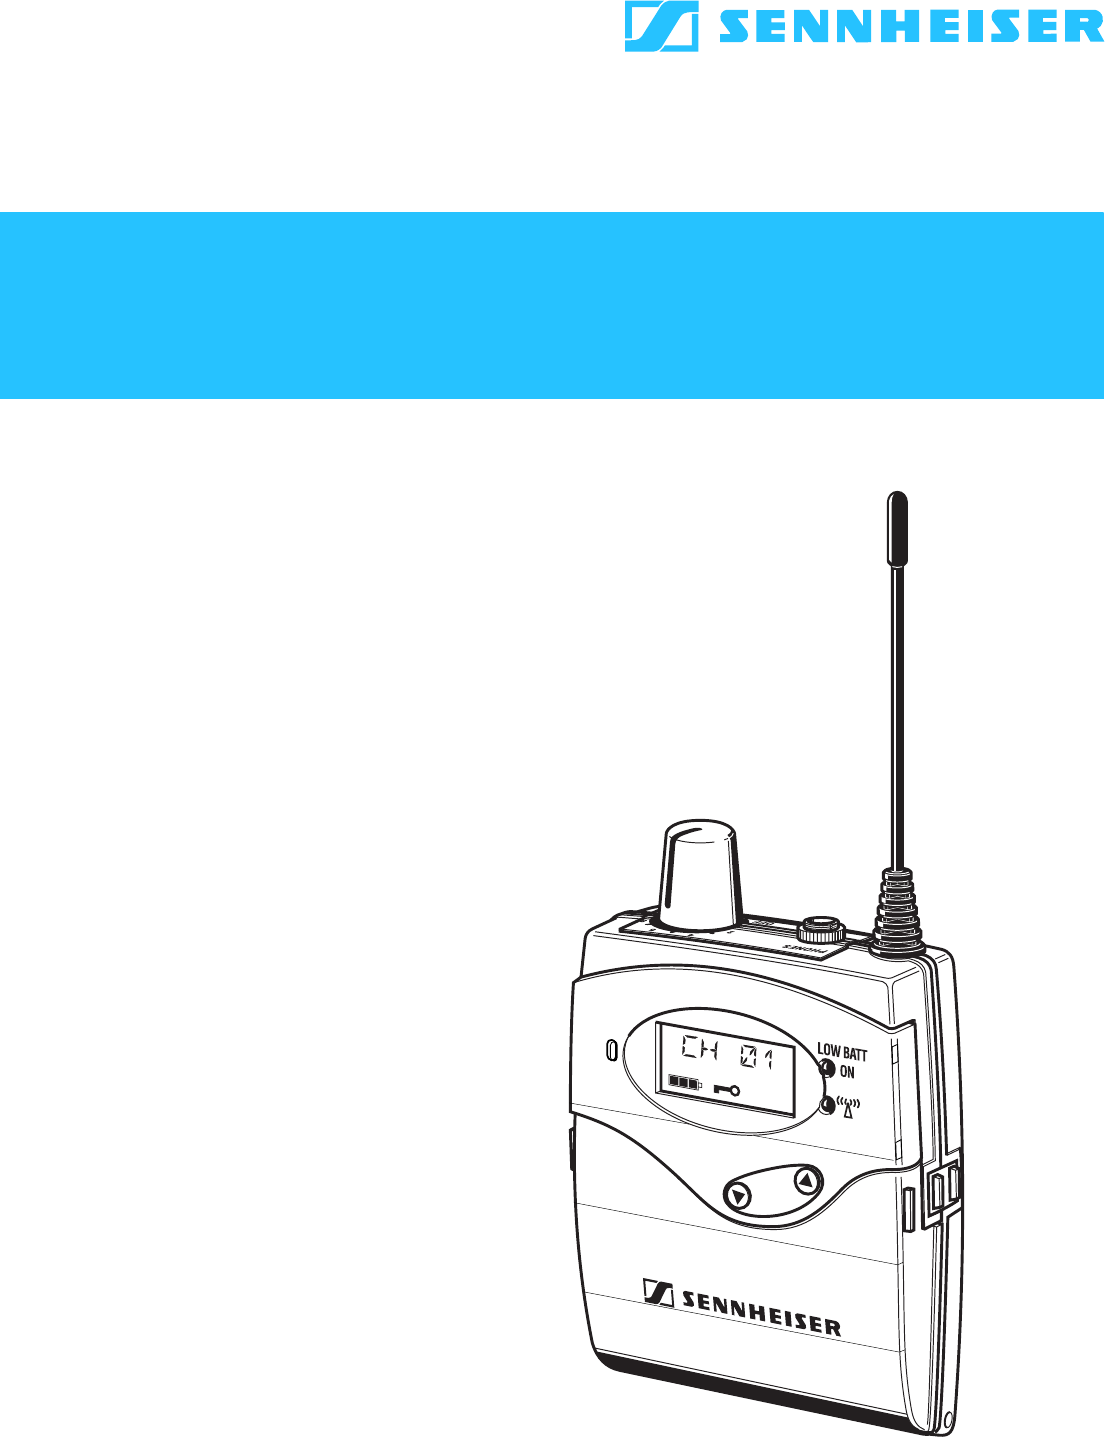
10EK 1038 receiverIndications Alphanumeric display 4-step battery status display Lock mode icon (lock mode is activated)Operation and battery sta
11 EK 1038 receiverPreparing for useInserting and changing the battery pack/batteriesFor powering the units, we recommend using the supplied BA 2015ba
12Using the receiverUsing the receiverSwitching the receiver on/off To switch the receiver on, turn the volume control clockwiseuntil it clicks. Th
13 Using the receiverNote:It is only possible to switch the channel if the lock mode is deac-tivated. If it is deactivated, no lock mode icon appear
14Using the receiverStarting the setup menuIn order to get into the configuration menu, the receiver must beswitched off. Open the battery compartme
15 Using the receiverGetting into the operating menu of the setup menu Press the SET button to get from the start display into theoperating menu. T
16Using the receiverAdjusting a setting Press the / (UP/DOWN) rocker button to adjust the settingof the menu.The new setting flashes on the displ
17 Using the receiverThe setup menu of the receiverLOC. OFF/ :ON, OFFLOC. ONLocking operationSTO REDSQ LO SQ MIDCurrent setting of squelch threshold/
18Using the receiverAdjustment tips for the setup menuLOCKActivating/deactivating the lock modeVia the “LOCK” menu, you can activate or deactiveate th
19 Using the receiverated simultaneously. As only the selectable channels are displayed,the user can quickly switch to the channel stated by the guide
20Using the receiverNote:y If the squelch threshold is adjusted too high, the transmissionrange will be reduced. Therefore, always adjust the squelcht
21 Using the receiverTo copy the settings: Place the receiver with “master” function above the infra-redinterface of the other receivers (slaves), on
22L 2015 quick chargerL 2015 quick chargerSpecial featuresThe L 2015 quick charger must only be used for automaticallycharging BA 2015 battery packs –
23 L 2015 quick chargerOperating controls Red LED CHARGE/ERROR (2 x) Green LED READY (2 x) Charging compartment for BA 2015 rechargeable battery (2
24L 2015 quick chargerPreparing for useCascading several chargers Make sure that the charger is disconnected from the mains. Unscrew the two screws
25 L 2015 quick chargerUsing the chargerCharging the rechargeable battery BA 2015 Insert the rechargeable battery into one of the two chargingcompa
26L 2015 quick chargerSuitable transmitters of the evolution wireless series G 2The EK 1038 bodypack receiver matches any of the transmitters(range E)
27 L 2015 quick chargerbeen preset so that e.g. country-specific regulations on frequencyusage are taken into account. The channel bank “U” (user bank
28SKM 100 G2 / SKM 300 G2 / SKM 500 G2 radiomicrophonesSKM 100 G2 / SKM 300 G2 / SKM 500 G2 radiomicrophonesDelivery includesThe packaging contains th
29 SKM 100 G2 / SKM 300 G2 / SKM 500 G2 radiomicrophonesPreparing for useInserting and changing the battery For powering the radiomicrophone, you can
3 ContentsContentsImportant safety instructions . . . . . . . . . . . . . . . . . . . . . . . . . . . . . . . . . . . . 5The tourguide UHF system
30SKM 100 G2 / SKM 300 G2 / SKM 500 G2 radiomicrophonesRemove the screw and put it to one side. Remove the microphone module by pulling it out of th
31 SKM 100 G2 / SKM 300 G2 / SKM 500 G2 radiomicrophonesMuting the radiomicrophoneThe radiomicrophone has a MUTE switch that noiselessly mutes theaudi
32SK 100 G2 / SK 300 G2 / SK 500 G2 bodypack transmittersSK 100 G2 / SK 300 G2 / SK 500 G2 bodypack transmittersDelivery includesThe packaging contain
33 SK 100 G2 / SK 300 G2 / SK 500 G2 bodypack transmittersPress the two unlocking buttons and open the battery com-partment cover . Insert the tw
34SK 100 G2 / SK 300 G2 / SK 500 G2 bodypack transmittersyThe prevention of improper charging of inserted primary cells(batteries). Due to the missing
35 SK 100 G2 / SK 300 G2 / SK 500 G2 bodypack transmittersUsing the bodypack transmitterSwitching the transmitter on/offThe transmitter can only be sw
36SKP100G2 / SKP500G2 plug-on transmittersSKP 100 G2 / SKP 500 G2 plug-on transmittersDelivery includesThe packaging contains the following items:y 1
37 SKP 100 G2 / SKP 500 G2 plug-on transmittersPreparing for useInserting and changing the batteryFor powering the plug-on transmitter, you can either
38SKP100G2 / SKP500G2 plug-on transmittersBetriebs- und BatterieanzeigeThe red LED (LOW BAT/ON) provides information on the currentoperating state o
39 LC display panel of the evolution wireless transmitters G 2LC display panel of the evolution wireless transmitters G 2LC display panel Alphanumeri
4ContentsSwitching between the channels in a channel bank . . . . . . . . . . . . . . .45Selecting the frequencies to be stored in the channel bank “
40LC display panel of the evolution wireless transmitters G 2“PILOT” displayThe “PILOT” display ! appears on the display panel when the pilottone tran
41 The operating menu of the transmitters evolution wireless series G 2The operating menu of the transmitters evolution wireless series G 2With the ex
42The operating menu of the transmitters evolution wireless series G 2Working with the operating menuBy way of example of the “TUNE” menu, this sectio
43 The operating menu of the transmitters evolution wireless series G 2Overview of the operating menu of the transmitters BANKChanging the channel ba
44The operating menu of the transmitters evolution wireless series G 2DISPLYPILOTActivating/deactivating the pilot tone transmissionSETPilot tone tran
45 Adjustment tips for the operating menuAdjustment tips for the operating menuBANK Switching between channel banks Via the “BANK” menu, you can switc
46Adjustment tips for the operating menuThe input sensitivity is adjusted too high when close talking dis-tances, speakers with loud voices or loud mu
47 Adjustment tips for the operating menuDISPLY Selecting the standard display Via the “DISPLY” menu, you can select the standard display:NAME Enterin
48Adjustment tips for the operating menuPILOT Activating/deactivating the pilot tone transmission (PILOT)Via the “PILOT” menu, you can activate or dea
49 TroubleshootingTroubleshootingError checklist If still operating problems with your transmission installation occur, please contact your local Senn
5 Important safety instructionsImportant safety instructions1. Read these instructions. 2. Keep these instructions.3. Heed all warnings. 4. Follow all
50Recommendations and tipsRecommendations and tips... for the receiver EK 1038y Transmission range depends to a large extent on location. Thereshould
51 HDX noise reductionHDX noise reductionProgress you can hear.This product family is equipped with HDX, the Sennheiser noisereduction system that red
52Accessories and spare partsAccessories and spare parts The following accessories are available from your authorized dealer:EK 1038 receiverBA 2015 A
53 Accessories and spare partsSK 100 G2 / SK 300 G2 / SK 500 G2 bodypack transmitterME 2 Clip-on microphone, condenser, omni-directionalMKE 2-ew Clip-
54SpecificationsSpecificationsEK 1038 receiverL 2015chargerTemperature range –10°C to +55°C Receiving frequencies 20Frequency range830–866 MHz (range
55 SpecificationsPlug-in mains unitsevolution wireless transmitters G 2Charging principle:ΔU methodDeep discharge recovery chargeTrickle chargerecharg
56SpecificationsChannel assignment You must check whether or not the product needs to be licensed by the national approval authorities.Weight approx.
57 Manufacturer declarationsManufacturer declarationsWarranty The original Sennheiser product you have purchased is covered by a war-ranty of 24 month
58Manufacturer declarationsCE Declaration of Conformity This equipment is in compliance with the essential requirements and otherrelevant provisions o
59 Manufacturer declarations
6Important safety instructionsPower sourceThis device should be operated only from the type of power source indicated onthe type plate. If you are not
Sennheiser electronic GmbH & Co. KGAm Labor 130900 Wedemark, GermanyPhone +49 (5130) 600 0 Printed in GermanyFax +49 (5130) 600 300 Publ. 01/08www
7 Important safety instructionsSafety instructions for Lithium-Ion rechargeable batteriesIf abused or misused, rechargeable batteries may leak. In ext
8The tourguide UHF systemThe tourguide UHF systemThe tourguide UHF system consists of the EK 1038 receiver in com-bination with a transmitter of the e
9 EK 1038 receiverEK 1038 receiverSpecial featuresThe EK 1038 receiver is a small and reliable bodypack receiver thatcan easily be attachted to the cl
Related products and manuals for Radio Stations Sennheiser LV308


 (4 pages)
 (61 pages)
© 2020, manymanuals.com. All rights reserved. | 0.761 s |
 Manymanuals.com
 Manymanuals.de
 Manymanuals.fr
 Manymanuals.it
 Manymanuals.pl
 Manymanuals.cz
 Manymanuals.es
 Manymanuals-pt.com
Comments to this Manuals