Sennheiser Freeport User Manual
Browse online or download User Manual for Microphones Sennheiser Freeport. Sennheiser Freeport User Manual
- Page / 16
- Table of contents
- BOOKMARKS
- Instructions for use 1
- Notice d‘emploi 1
- Istruzioni per l’uso 1
- Instrucciones de uso 1
- Contents 2
- Important safety instructions 3
- The freePORT systems 4
- EM 1 receiver 5
- SK 2 bodypack transmitter 7
- SKM 3 radio microphone 9
- Setting up the system 10
- Care and maintenance 11
- If problems occur 12
- Accessories and variants 12
- Individual components 13
- ME 2 clip-on microphone 13
- Range B: 691 to 693 MHz 13
- System characteristics 13
- Connector assignment 14
- Manufacturer declarations 15
- Am Labor 1 16
- 30900 Wedemark, Germany 16
Summary of Contents
Instructions for useNotice d‘emploiIstruzioni per l’usoInstrucciones de usofreeport_514013_0808_Sp5.book Seite 1 Mittwoch, 26. November 2008 2:16
9Switching the radio microphone on/off왘 Use the ON/OFF switch to switch the radio microphone on or off.If the radio microphone is switched on, the r
10Adjusting the squelch thresholdInterference due to other transmission links can be eliminated asfollows:왘 Switch off the transmitter. The receiver s
11If problems occur...Accessories and variantsProblem Possible cause Possible solutionNo operation indication Battery is flat Replace the batteryNo ma
12Specifications of the freePORT systemsSystem characteristicsIndividual componentsME 2 clip-on microphoneTransmission/receiving frequencies4 UHF tran
13Type approvalsAlso approved byTransmitters that operate in the frequency range E (863 – 865 MHz) can be used licence-free in thefollowing countries:
14Manufacturer declarationsWarrantySennheiser electronic GmbH & Co. KG gives a warranty of 24 months on this product. For the current warranty con
Sennheiser electronic GmbH & Co. KGAm Labor 130900 Wedemark, Germanywww.sennheiser.comPrinted in Taiwan
1Contents Important safety instructions ... 2The freePORT systems ...
2Important safety instructionsy Read this instruction manual.y Keep this instruction manual in a safe place. Always include thisinstruction manual whe
3The freePORT systemsDesigned for different areas of application, the freePORT systems areavailable in three variants.y Presentation Set:This system i
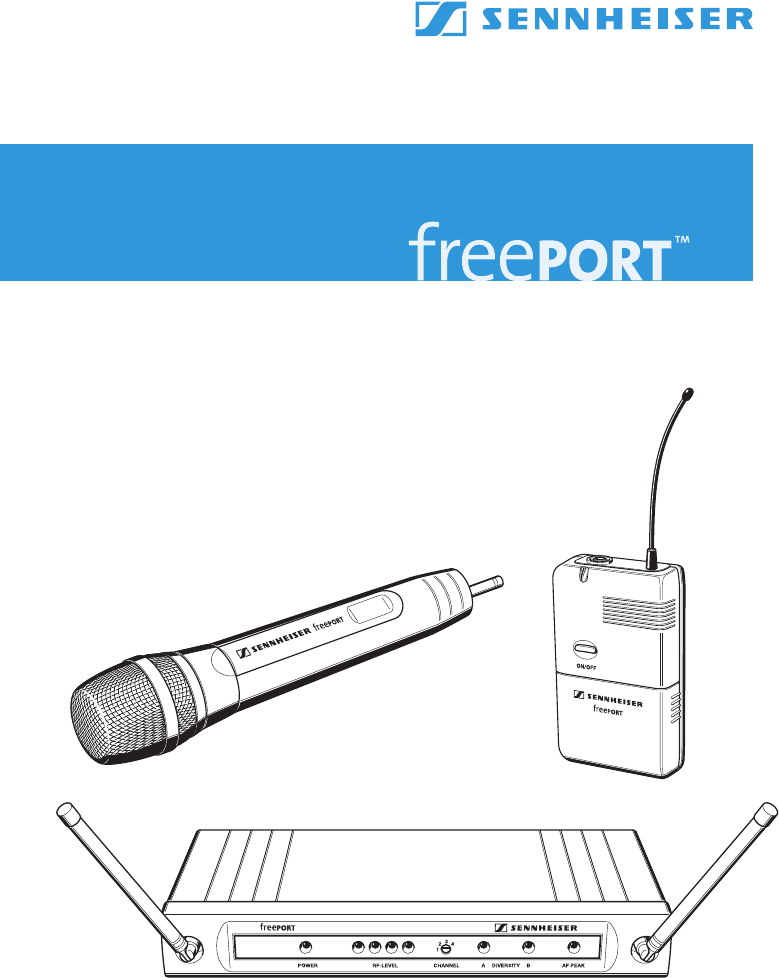
4Delivery includesEM 1 receiverFreePORT systemsEM 1 receiverSK 2bodypack transmitterSKM 3radio microphoneMains unit (NTxy)ME 2clip-on microphone¼” (6.
5Connecting the receiver왘 Insert the DC connector on the mains cable into the DC socket andconnect it to the mains. The green LED for operation indi
6SK 2 bodypack transmitterInserting/replacing the batteryWe recommend powering the bodypack transmitter by a 9 V PP3alkaline battery (IEC 6 LR 61). If
7Connecting the microphone/instrument cableThe audio input is designed for the connection of both the ME 2 clip-onmicrophone and instruments (e.g. gui
8SKM 3 radio microphoneNote:The microphone head of the radio microphone cannot be changed. Inserting/replacing the batteryWe recommend powering the ra
Related products and manuals for Microphones Sennheiser Freeport


 (180 pages)
 (12 pages)
(2 pages)
(2 pages)
(8 pages)
(13 pages)
(2 pages)
(1 pages)
(12 pages)
(2 pages)
(2 pages)
(8 pages)
(13 pages)
(2 pages)
(1 pages)
© 2020, manymanuals.com. All rights reserved. | 1.212 s |
 Manymanuals.com
 Manymanuals.de
 Manymanuals.fr
 Manymanuals.it
 Manymanuals.pl
 Manymanuals.cz
 Manymanuals.es
 Manymanuals-pt.com
Comments to this Manuals