Sennheiser TV Cables ADN User Manual
Browse online or download User Manual for Supplementary music equipment Sennheiser TV Cables ADN. Sennheiser TV Cables ADN User's Manual
- Page / 121
- Table of contents
- BOOKMARKS
- DISTRIBUTION 1
- Contents 2
- Important safety instructions 4
- Overview of the components 8
- ADN D1 delegate unit 9
- ADN C1 chairman unit 10
- ADN CU1 central unit 11
- Direct Access 30 Units 12
- 22 12
- 1 2 15 14
- Voltage supply = 52.8 V 14
- >35 V >35 V 14
- Conference Manager software 15
- 100-240V~ 17
- 50/60Hz 240W 17
- IN OUT 18
- IN –– AUDIO –– OUT 20
- PORT II PORT I 20
- 2x 52.8V 1.75A 21
- Using the central unit 22
- Deleg Chair 25
- Port1: xx xx Units 25
- Port2: xx xx Units 25
- 30 Units 26
- Direct Access 35
- Processing 38
- Audio Distribution Network 38
- Running a conference 45
- Operating a delegate unit 46
- Operating a chairman unit 47
- 192 . 168 . 1 . 145 55
- Starting/exiting the software 56
- “Setup” operating mode 87
- “Live” operating mode 96
- Cleaning and maintaining the 105
- Updating the firmware of the 106
- If a problem occurs 107
- . Description 109
- Specifications 110
- Appendix 112
- Keyboard layouts 113
- Manufacturer Declarations 117
- Printed in Germany 121
- Publ. 02/10 121
- 535364/A01 121
Summary of Contents
SENNHEISER ADN AUDIODISTRIBUTIONNETWORKInstruction manual
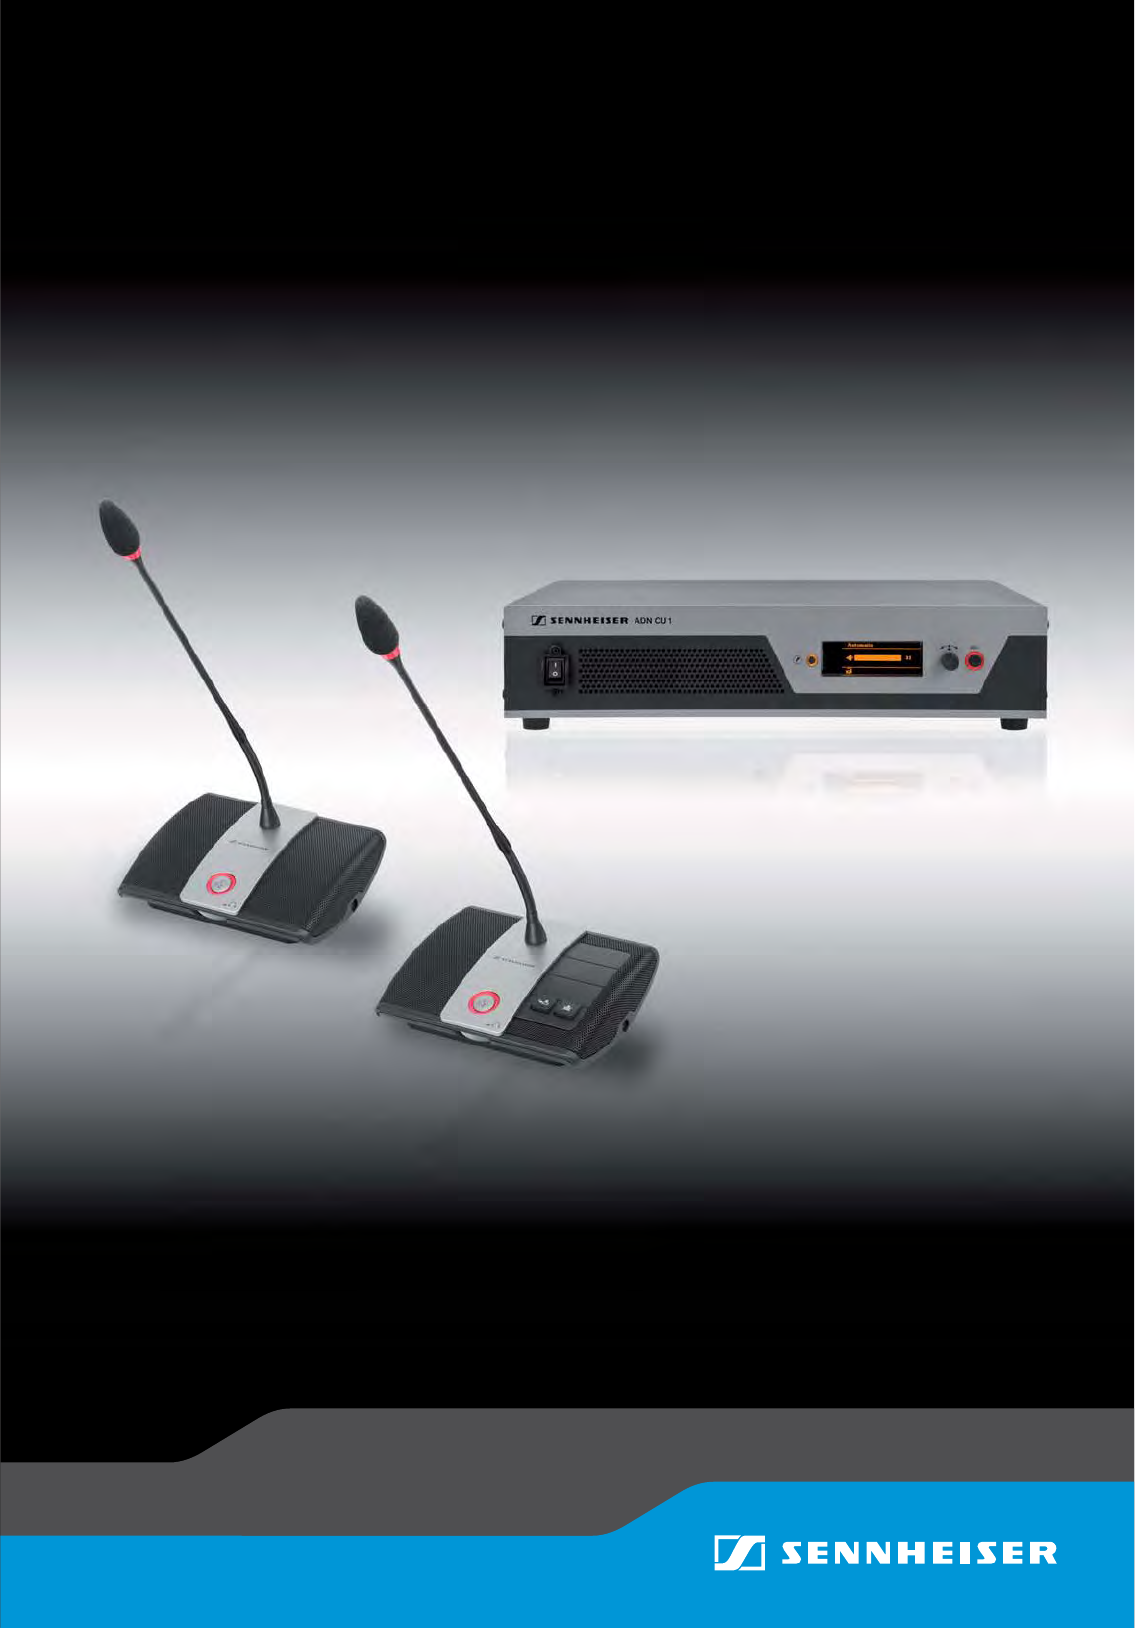
9Overview of the componentsADN C1 chairman unitSound inlet basket with firmly fixed windshieldIN socketSignal light ring OUT socketHeadphone socketPr
99Using the “Conference Manager” softwareOverview of the bar graphs The conference unit icons display the current status of the conference units conn
Using the “Conference Manager” software100To grant speaking privileges to a conference unit by the order of the request-to-speak list (in “Request” an
101Using the “Conference Manager” softwareAdjusting settings during a running conferenceIn “Live” operating mode, the boxes “Volume”, “Audio XLR”, “T
Using the “Conference Manager” software102To change the speaking time limit:왘 In the “Talk Time” box, enter the desired speaking time limit into the d
103Using the “Conference Manager” software왘 Click the button.The “Protocol” window appears.Changes and warnings are listed in chronological order:E
Cleaning and maintaining the conference system104Cleaning and maintaining the conference system왘 Before cleaning, switch the central unit off and disc
105Updating the firmware of the conference systemUpdating the firmware of the conference systemFor information on firmware updates for your ADN confe
If a problem occurs ...106If a problem occurs ...Conference systemProblem Possible cause Possible solution PageCentral unit cannot be switched onThe c
107If a problem occurs ...“Conference Manager” softwareIf a problem occurs that is not listed in the above table or if the problem cannot be solved w
Accessories108AccessoriesCat. No. DescriptionCentral unit502757 ADN CU1 central unit054324 Mains cable, EU version, black, 1.8 m054325 Mains cable, U
Overview of the components10ADN CU1 central unitA Front view B Rear viewOn/off switch IN audio inputStandard display key OUT audio outputDisplay panel
109SpecificationsSpecificationsADN D1 and ADN C1 conference unitsLoudspeakerMicrophoneADN CU1 central unitXLR INDimensions (w/o gooseneck) 185 x 63
Specifications110XLR OUTOutput resistance ROUT < 100 ΩFrequency response 20 Hz to 14.5 kHz; −3 dBOutput level max. +11 dBuNominal level +6 dBuDHT (
111AppendixAppendixADN CU1 mounting dimensionsFactory default settings Menu item/description Factory default settings“Conference Mode” – conference m
Appendix112Keyboard layoutsThe central unit support keyboards with the following language layouts:“Blink on Request” – flashing of the signal light ri
113AppendixMicrosoft Software License Terms Microsoft Software License Terms for Windows XP Embedded and Windows Embedded Standard RuntimeThese licen
Appendix114a. Consent for Internet-Based Services. The software features described below connect to Microsoft or service provider computer systems ov
115AppendixThis limitation applies to:• Anything related to the software, services, content (including code) on third party internet sites, or third
Manufacturer Declarations116Manufacturer DeclarationsWarrantySennheiser electronic GmbH & Co. KG gives a warranty of 24 months on this product. Fo
119IndexIndexAAccessories 108Addingconference units 48ADN C1, see chairman unitADN CU1 display panel, see display panelADN CU1, see central unitAdvan
Index120saving a configuration 69Scan 86“Setup” operating mode 49, 72, 90setting the function of the “All Micros OFF” button 92starting/exiting the
11Overview of the componentsOverview of the ADN CU1 display panelAfter switch-on, the central unit’s display shows a progress bar for approx. 30 seco
121IndexMicrophoneactivating 45deactivating 45Microphone Limit 27, 91NNetwork settings 42, 65configuring Windows 52dynamic IP addressing 53, 65sta
Sennheiser electronic GmbH & Co. KG Am Labor 1, 30900 Wedemark, Germany www.sennheiser.com Printed in GermanyPubl. 02/10 535364/A01
Overview of the components12The “Conference Manager” softwareThe “Conference Manager” software allows you to conveniently configure and control the en
13Structuring and controlling the conference systemStructuring and controlling the conference systemStructuring the conference systemThe ADN conferen
Structuring and controlling the conference system14Configuring and controlling the conference systemFor configuring the conference system, you can eit
15Putting the conference system into operationPutting the conference system into operationPreparing the central unit for useSetting up the central un
Putting the conference system into operation16왘 Slide the central unit with the mounted rack mount “ears” into the 19” rack and support the weight wit
17Putting the conference system into operationSetting up the conference systemInstalling the cable holderIf you want to permanently install your conf
Putting the conference system into operation18If you are using cable holders (see previous chapter):왘 Choose a suitable cover for the cable holder
1ContentsContentsImportant safety instructions ... 3The Sennhei
19Putting the conference system into operationConnecting external audio devices to the central unitTo output the floor channel via an external audio
Putting the conference system into operation20Running the software on a separate Windows PCTo run the “Conference Manager” software on a separate Wind
21Using the central unitUsing the central unitDeactivating the lock mode of the central unitIf the lock mode is activated (see page 43), you have to
Configuring the conference system via the central unit22Configuring the conference system via the central unitOverview of the operating menuConference
23Configuring the conference system via the central unitDisplay Function of the menu item Option/display Page“Main Menu”“Conference” Calls up the “Co
Configuring the conference system via the central unit24“XLR In” menu“XLR In Status” Activates/deactivates the IN audio input “On“/“Off” 31“XLR In Se
25Configuring the conference system via the central unitWorking with the operating menuBy way of example of the “Microphone Limit” menu item, this se
Configuring the conference system via the central unit26왘 Press the jog dial.Your setting is stored. You are back to the operating menu.Canceling an e
27Configuring the conference system via the central unitIf the maximum number of speakers who can take the floor simultaneously (“Microphone Limit”)
Configuring the conference system via the central unit28Setting the maximum number of requests to speak – “Request Limit”Adjustment range: “0” ... “10
Contents2Cleaning and maintaining the conference system ... 104Updating the firmware of the conference s
29Configuring the conference system via the central unit왘 Set the advance warning time. This setting affects your conference as follows (example):Det
Configuring the conference system via the central unit30Activating/deactivating the flashing of the signal light ring when a request to speak is made
31Configuring the conference system via the central unitAdjusting the audio settings – “Audio”The “Audio” submenu allows you to adjust settings that
Configuring the conference system via the central unit32Adjusting settings for the floor channel – “Floor/Loudspeakers”Adjusting the processing of the
33Configuring the conference system via the central unitBehavior “0.0 dB per Mic” ... “–3.0 dB per Mic” setting:With each additional audio signal, th
Configuring the conference system via the central unit34Checking the system and detecting problems – “System”The “System” submenu provides information
35Configuring the conference system via the central unitThe following tables show possible error indications and steps for error elimination.Display
Configuring the conference system via the central unit36Remedy 왘 Perform a manual self-test (see page 40). The display can change as follows:– The str
37Configuring the conference system via the central unitDisplaying the type and number of conference units connected to the connections PORT I or POR
Configuring the conference system via the central unit38System analysis – “Diagnostics” submenuThe “Diagnostics” menu item provides information on the
3Important safety instructionsImportant safety instructions1. Read these instructions.2. Keep these instructions. Always include these instructions w
39Configuring the conference system via the central unit• If necessary, further reduce the number of conference units until there are no errors repor
Configuring the conference system via the central unit40Permanent transmission errors must be eliminated immediately in order to ensure trouble-free o
41Configuring the conference system via the central unitDisplaying the hardware and software version – “Versions” submenuThe “Versions” menu item pro
Configuring the conference system via the central unit42Adjusting further settings – “Settings”Adjusting network settings – “Network” submenuThe “Netw
43Configuring the conference system via the central unitActivating the lock mode – “Lock”When you activate the lock mode, you are automatically retur
Running a conference44Running a conferenceThe character of your conference (i.e. the conditions under which the participants can take the floor or are
45Running a conferenceOperating a delegate unitTaking the floor/Making a request to speakDepending on the conference mode set (see page 26) you can•
Running a conference46Connecting headphonesYou can connect mono or stereo headphones to the conference unit to listen to the floor channel. The headph
47Running a conferenceGranting speaking privilegesIf – in “Request” mode – a participant presses the microphone key on his or her delegate unit, he o
Running a conference48Muting all delegate units temporarily (priority function)Using the priority function, the chairman can interrupt a discussion at
Important safety instructions4Hazard warnings on the rear of the central unitThe label shown on the left is attached to the rear of the central unit.
49Using the “Conference Manager” softwareUsing the “Conference Manager” softwarePossibilities of usage of the software and the conference systemThe “
Using the “Conference Manager” software50The following overview shows the functions that are available depending on the connections status:Preparing t
51Using the “Conference Manager” softwareInstalling the “Conference Manager” software왘 Start the “ADNSetup.exe” file in the “Conference Manager” fold
Using the “Conference Manager” software52Adjusting the network settings To enable communication between the central unit and the Windows PC:왘 Make su
53Using the “Conference Manager” software왘 Click “Network Connections” in the right column:The “Network Connections” window appears.왘 Click “Manage n
Using the “Conference Manager” software54Settings to be adjusted via the central unit (see page 42):왘 On the central unit, call up the “IP Mode” menu
55Using the “Conference Manager” softwareStarting/exiting the softwareThe central unit’s integrated softwareTo start the central unit’s integrated so
Using the “Conference Manager” software56Getting to know and adjusting the basic features of the softwareOverview of the softwareThe main application
57Using the “Conference Manager” softwareMenu bar aMenu Submenu Function Page Global Menu New ConferenceCreates a new configuration 67Open Conference
Using the “Conference Manager” software58Buttons for selecting the views Toolbar Buttons for selecting the operating mode Alternatively, you can also
5The Sennheiser ADN conference systemThe Sennheiser ADN conference systemSennheiser ADN stands for Sennheiser Audio Distribution Network – the new
59Using the “Conference Manager” softwareSelecting operating modes and viewsIn “Setup” and “Live” operating mode, you can switch between the Room Vie
Using the “Conference Manager” software60Selecting the “Setup” operating mode 왘 Click the “Setup” button.The software changes to “Setup” operating mod
61Using the “Conference Manager” softwareSelecting the “Live” operating mode 왘 Prepare the “Live” operating mode and activate it (see page 95).To di
Using the “Conference Manager” software62Adjusting the Room View window and the Delegate View window to your needsYou can adjust the Room View window
63Using the “Conference Manager” softwareUsing the full screen mode of the Windows software왘 In the menu bar, click “Edit” > “Full Screen”.The ful
Using the “Conference Manager” software64Selecting the language왘 In the menu bar, click “Settings” > “Language”.A list with the available languages
65Using the “Conference Manager” softwareAdjusting network settings왘 In the menu bar, click “Settings” > “Network...”.The “Network Settings” windo
Using the “Conference Manager” software66Using the conference system and the softwareConnecting the software to the central unitTo connect the “Confer
67Using the “Conference Manager” softwareEliminating connection problemsIf no connection to the central unit can be established or if the configurati
Using the “Conference Manager” software68Loading a configuration왘 In the menu bar, click “Global Menu” > “Open Conference”.The “Open” window appear
Available system components – scope of delivery6Available system components – scope of deliveryThe following ADN system components are available:Cent
69Using the “Conference Manager” softwareActivating/deactivating automatic loading of a configurationTo automatically load a saved configuration at s
Using the “Conference Manager” software70To save a newly created configuration on the hard disk of the Windows PC:왘 In the menu bar, click “Global Men
71Using the “Conference Manager” softwareDeleting a configuration from the central unit왘 In the menu bar, click “Global Menu” > “Delete”.The “Dele
Using the “Conference Manager” software72Preparing a conference and mapping a conference room – “Setup” operating modeIn “Setup” operating mode, you c
73Using the “Conference Manager” softwareExample of a graphical representation of the conference room (see page 74):
Using the “Conference Manager” software74Example of a delegate list (see page 85):Planning and mapping the conference roomPlacing objects on the canva
75Using the “Conference Manager” software왘 Select an object from the “Equipment”, “Images” or “Microphone Unit(s)” library panels. The selected objec
Using the “Conference Manager” software76왘 Select the shape of the rectangles or circles from the “Proportion of Table” drop-down list.The thumbnail d
77Using the “Conference Manager” softwareDefining fill, line and border attributesPlease note when defining fill, line and border attributes:If you s
Using the “Conference Manager” software78To define the line color:왘 Select the object.왘 Click the “Color” button.왘 Select a standard color.Or:왘 Click
7Overview of the componentsOverview of the componentsFor conferencing, you require:•1 ADN CU1 central unit•ADN D1 delegate units•ADN C1 chairman unit
79Using the “Conference Manager” software왘 Click the “Room View” button .To add an image file*:왘 In the “Images” library panel, click “Import...“.Th
Using the “Conference Manager” software80Automatically aligning objects 왘 Hold down the “CTRL” key and select several objects on the canvas using the
81Using the “Conference Manager” softwareUndoing/redoing actions 왘 Click the Room View button .To reverse the last action you performed:왘 Click the
Using the “Conference Manager” software82To move an object forwards:왘 Select an object.왘 Click the icon. The selected object is moved forwards.Enlar
83Using the “Conference Manager” softwareChanging the size of the canvas 왘 Click the Room View button .To enlarge/reduce the size of the canvas:왘 Se
Using the “Conference Manager” software84To show/hide the grid lines:왘 Tick/untick the “Show” check box.To adjust the grid size:왘 Enter the desired gr
85Using the “Conference Manager” softwareManaging delegate dataCreating a delegate list 왘 Click the Delegate View button .The Delegate View window a
Using the “Conference Manager” software86왘 Enter a file name.왘 Select the desired storage location.왘 Click “OK”.The window closes and the delegate lis
87Using the “Conference Manager” software왘 Click the Room View button .왘 In the “Microphone Unit(s)” library panel, click the “Scan” button.The conf
Using the “Conference Manager” software88Starting/stopping initialization of the conference units To start the initialization of the conference units:
Overview of the components8ADN D1 delegate unitSound inlet basket with firmly fixed windshieldIN socket Signal light ring OUT socketHeadphone socketHe
89Using the “Conference Manager” software왘 Select the desired name from the “Delegate” drop-down list.The name is assigned to the conference unit and
Using the “Conference Manager” software90Adjusting the conference settings – “Setup” operating modeAdjusting the conference mode왘 Click the button o
91Using the “Conference Manager” softwareSetting the max. number of speakers who can take the floor simultaneouslyIn the “Microphone Limit” field, yo
Using the “Conference Manager” software92To set the speaking time limit:왘 Enter the speaking time into the “Talk Time Limit” field.Adjustment range: “
93Using the “Conference Manager” softwareLocking/unlocking the central unit’s operating menu To protect the central unit’s operating menu against any
Using the “Conference Manager” software94To set the floor channel volume:왘 Move the “Volume” slider ... upwards to increase the floor channel volum
95Using the “Conference Manager” softwareUsing the OUT audio output/IN audio input and setting the tone colorTo activate/deactivate the OUT audio out
Using the “Conference Manager” software96왘 Enter a file name into the drop-down list. 왘 Click “OK”.The configuration is saved on the central unit and
97Using the “Conference Manager” softwareUsing the software for controlling a running conferenceIf you want to use the software for controlling a run
Using the “Conference Manager” software98Monitoring a conference using the Delegate View windowOverview of the conference unit icons The conference un
Related products and manuals for Supplementary music equipment Sennheiser TV Cables ADN
 (64 pages)
 (14 pages)
© 2020, manymanuals.com. All rights reserved. | 0.821 s |
 Manymanuals.com
 Manymanuals.de
 Manymanuals.fr
 Manymanuals.it
 Manymanuals.pl
 Manymanuals.cz
 Manymanuals.es
 Manymanuals-pt.com
Comments to this Manuals